I can't believe I haven't posted this yet! I am TOTALLY behind. Sorry for the onslaught of posts, but it's now, or never, people. And, I figure folks may be able to use this info for next year. So here ya go...
Here are the pics from our Homes Cool Pumpkin Day, a day with our church's homeschool group to celebrate Halloween. We had a blast!
When he/she arrived, each kiddo got a little packet with different Halloween worksheets/printables. A lot of these worksheets can be found (the links, anyway) in my Pumpkin Unit Study post here. The books with the black covers were for the older boys (with age specific worksheets). The color of the ribbon indicates the grade level of the booklet. The orange booklets had a pumpkin printed on the top. We used those pumpkins to make a pumpkin glyph (a picture graph).
You can download the Pumpkin Glyph here.
While the bigger kids were making glyphs, the toddlers were putting felt faces on pumpkins. Really, I need to devote an entire post to this project. The twins and I used these felt pumpkins over and over during October to help them learn their shapes.
I made print outs of different pumpkin faces with different shapes for their eyes, nose, and mouth. Then, they used to the felt pieces to make the picture. For the life of me, I can not find the blog where I got the printables. If you are familiar with it, let me know. They worked perfectly!
After making the pumpkin glyph, we had fun estimating the size of a pumpkin. We talked about what it meant to estimate. Then, we brainstormed about how we could measure the circumference of the pumpkin since a ruler wouldn't do the trick. Then, each kiddo took the string and cut off a piece that he/she thought was the correct size. We each took a turn wrapping our string around the pumpkin, then laid it on the floor next to everyone elses' and discussed whether the string was too long, too short, or just right.
Probably the most thrilling part of the day for the kids was learning that a pumpkin can indeed float. We went around the room making our predictions (and, obviously, discussed the definition of "prediction"). Then, we went outside where I had a big bucket of water waiting.
Of course, they had to see if they could push the pumpkin down...
After a few activities, we settled down for some lunch. One Cool Mama made some spider web pumpkin muffins. These things were gooooood, ya'll. And, you know I don't ever use the word "ya'll" unless something is so good that it brings out the country in me.
I loved making these little ghost bananas. They could not have been easier to make and the kids loved them. I just broke each 'nanner in half, then added mini chocolate chips for eyes.
Mummy dogs! We have to make these every year for Halloween. Just wrap a hot dog in crescent roll strips, bake at 375* for 13 - 17 minutes, then add mustard eyes when they've cooled!
Crazy faces for Pumpkin Day!
So sweet. During lesson time, Sawyer went over and sat in his big brother's lap. :)
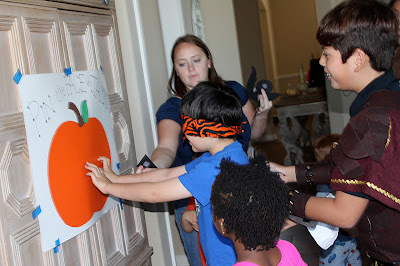
After lunch, we played a little Pin the Face on Jack for fun.
I made this quickly the night before by cutting up a large orange posterboard and gluing it to the white posterboard. I recently packed this up with our Halloween decorations to play again next year. The kids just had too much fun with it to throw it away. Here's to hoping it hold up in the attic for a year!
Hmmmm...somebody cheated a bit to get this perfect Jack-o-latern face....
One of my favorite parts was that everyone dressed up for the party!
A little pumpkin decor was in order, of course. You can find this and other awesome Halloween party printables for free here at the Hostess with the Mostess.
These were our little party favors. Martha Stewart was so kind as to personally design these jack-o-latern printables just for our party. Don't worry. I share them with you. Just click over here.
Do you have special events with your homeschool coop?


